Friday, September 12, 2014

Tying down the loose ends with engine installed

Now, with the engine installed, there are a few odd jobs here and there that need to be done. First the fuel line need to be finished. With the engine in place, it's now apparent where it should lead to.


I actually liked the routing. It's far enough from the exhaust manifolds. My fuel is staying cold. However, this time I messed up my flare and caused a fuel leak. I had to buy a new line and a new hose barb. The repair resulted in even further damage:


The new line was pre-flared and the new fitting came in from www.thewrenchmonkey.ca. The result is similar to the above sans the leak.

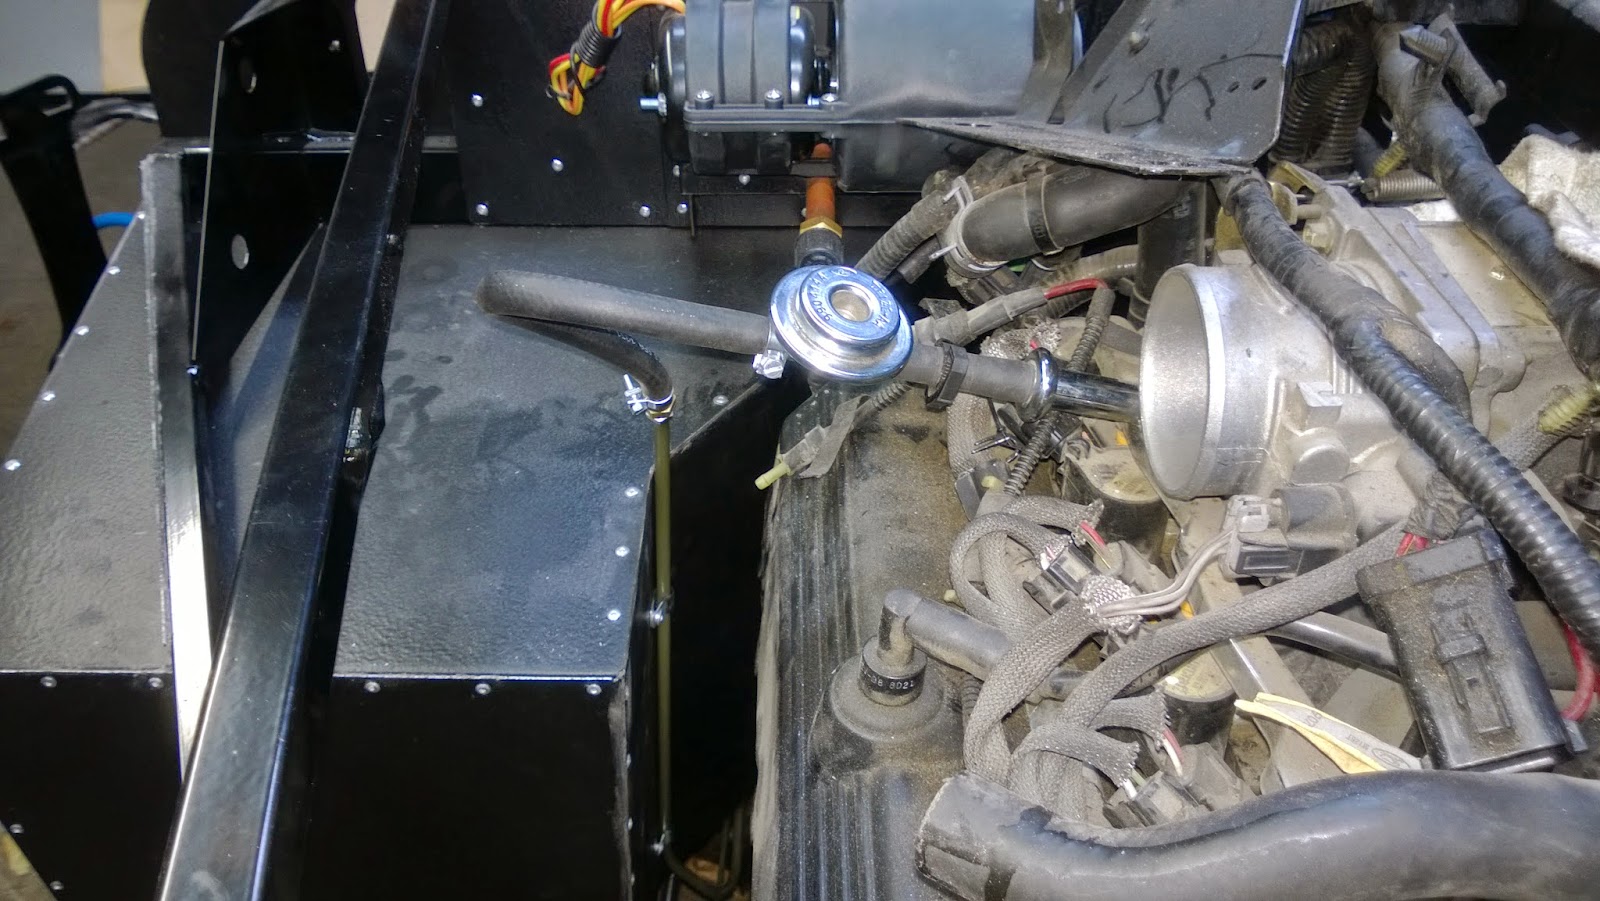
The next task was to please everyone. My wife being a tree huger would never forgive me for not running all of the possible emissions control systems. On the other hand, any car person would agree that the engine bay should look "clean" and free of "useless junk". Naturally, the vapors purge valve needs to be hidden well.
 

This is actually the spot between the passenger foot box and the engine. It's very close to the bottom 4" frame. Obviously, it's well out of sight. I did however screw it up on the first go. The starter was too close to the valve for my comfort. I had to move it up about an inch and a bit and plug the holes.

One more thing I've noticed is the ground clearance of the oil pan.


Never-mind the hanging power steering bits but notice the silver oil pan hanging just bellow the frame. I could give up and forget about this but I would not be able to clear a speed bump without skipping a heartbeat later. This time again I had to deal with Jeff from Whitby Motorcars. They had the motor mount spacers in about the right height to raise the engine just enough. I send the payment in and after about two month the spacer were home. I was not really in a big rush to install them either. About two more month later, they were installed and in fact did their job. The parts are extremely simple to fabricate but I am glad I purchased them. The thickness of the spacers was spot on. If they were just a notch thicker the steering column would not clear the exhaust manifold. On the other hand, any thinner would leave the pan hanging lower 4" frame.

Summit as usually ensured that I don't sit still for long.


Seems like it's the time to yank the engine back out!!!

Thursday, August 7, 2014

Engine goes in. Take 1

I realize that I am about 8 month behind on my writing now. However, I have a lot of progress and have taken pictures all along. Hopefully, I'll be able to catch up one day. In my defense, my wife and I just had our first baby. :) Now I have another "project" to work on too.

Alright, at this time, everything looks ready for the engine to go in. I have spray painted the motor mounts and bolted them on.


I also installed the AC delete idler pulley.  I had to use Ford Racing part instead of the Factory Five supplied one.


The main reason was that I was missing the inserts that go into the engine block and are part of the AC compressor. Unfortunately, I did not know at the time of the donor tear down that I needed to pull those inserts out. Oh well, now I have a cool part. It looks much better than the Factory Five counter piece.

I think we are ready.


Up it goes


 And down it goes


If you know what needs to be done between those picture you'd think that there's a transmission bolted up behind. Well, it was the plan but was not meant to be. As I was pulling parts off the self, I've noticed that the clutch was on its way out. It had some meat left but not enough to be installed. So this turned out to be a mock engine install. Summit Racing has my new clutch on the way.

Thursday, July 31, 2014

EGR puzzle solved

The engine is almost ready to go in but there are some small details to take care of. One of those is the EGR tube. This engine has EGR system and, therefore, has a metal tube going from the exhaust to the intake. If I were to flip the exhaust manifolds 180 deg to make them point forward, the original EGR tube would not be aligned with its fitting any more. The simple way out would be to remove the EGR system all together and forget about its existence. However, after some reading on Wikipedia, I learned that EGR system has its place in my car. Mainly, I'll try to reduce the fuel consumption whenever possible. EGR allows to inject some of the exhaust gas back into the intake charge. At low loads this translates into a smaller effective engine size. Sounds good if you ask me.

Let's start with the hard part: how do I extend the EGR tubing. The original tube is stainless steel. I would need to get more tubing and bend it into the shape to run along the head. Then, it would need to be flared for the compression fitting. Sounds easy enough but I cannot weld SS and have no means for bending and flaring. The other thought would be to relocate the fitting. If i were to relocate it closer to the tube's end I would have less fabrication to do. I wanted to weld on the fitting right to the header in the desired location but was told that the cast iron might crack later. Threading a new hole also did not promise much durability since the walls of the headers are thin and would not provide enough threaded surface. Also finding the 18mm tap would be a fun hunt on it's own. So I have resorted to maintaining the current positions of all the involved parts and running the flexible tubing.


This is 5/8 ID stainless steel flexible tubing that I got from B & B Specialties. Originally I thought it could be welded right on to the current tube. The trick would be to use a thick enough washer that would fit around the thin tubing and would allow for the proper weld to form. I even got myself a few of the large size lock washers. However, my friend was not confident in the weld being quality to have a proper seal. He offered to braze it with brass. I have never heard of the technique but he assured me that it's the best quality seal and will withstand the heat of exhaust gases.


This is how the finished product looks like. Mean while I had a chance to spray paint the headers too.


They look absolutely horrible but are not so bad parts. Apparently they flow as good as some of the shorties out there. In addition, I did some work to port them. But the reality is, since I am sticking to cats, my entire exhaust looks like ... ( i could only put a "bad" word here). Let's make it's best.


I did the same for the cats too.


 After all was done, the parts went back onto the motor. Here's the shot of the head with the original bracket holding holding the tube in place.


The routing of the tube was a bit hard. I could not find enough space to make it clear everything.


So now the oil filter is in the way. Oh well, I was planning on relocating it anyways. Note that it's not necessary and FactoryFive does not relocate the oil filters on 4.6 motors. I am doing so because I want to and I have some cheesy excuses too: EGR tube is touching it, easier access for oil changes, relocation kit looks cool, blah blah blah.

For now I left the tube unsupported but I will be using steel wire to secure it to the exhaust header. Later I am planing to wrap the exhaust blanket around all this ugly to ensure that (a) I never have to see it again and (b) to keep the heat from slow roasting our legs in the foot boxes. I got these from Jegs in the mail.

Hmm. what's next?

Saturday, March 1, 2014

Oil pan swap

The original oil pan that is used on the engine is flawless but does not work for my cobra. The reason being is that it's too tall. The engine sits much lower in cobra and the tall oil pan protrudes way too low. The risk of puncturing the oil pan and loosing all the oil is unacceptably high. Therefore the oil pan needs to be replaced with something that works for my application. The Factory Five was supposed to include the oil pan with my kit but they choose not too. Shame on them. After long arguments with them I did not get the part nor the money. I am disappointed how they handled this but what can you do. Luckily, there are other sources. I placed an order with North Racecars and got a Camp oil pan. It's supposed to be great in almost every condition: street, strip or circle track. To save on shipping I sent my parts to CBI. Now that I had a trip to US in my future, I decided to make it worth while. After some time on Summit Racing and Jegs a rather noticeable dent was made on my credit card. A few weeks later, I got the fruits of my investment. 


So onto the oil pan replacement. Flip the engine.


Grab a wrench and take the original off. So we have this


This is not the end yet, the oil pick up must go too. This one is designed for the deeper original pan.


You can see how much shorter the right side is on the one on the top. The original is the bottom one on the picture.


The new oil pick up in place. It's probably safe to reuse the old gasket. It's a well made gasket with rubber insert. However, I wanted to go extra mile and got new one by Fel-Pro. Remember to apply bead of gasket maker on the spots where block joins with various covers.


At last, the oil pan comes on. I had to shorten the mounting bolts a bit so they fit. The new oil pan design does no allow the bolts to go in some locations.


It's very important for the uniform seal to follow Ford's instruction on the tightening order of the bolts.


Flip the engine over, pull the deep stick out. It too needs to be adjusted. Measure and clip the end off to ensure it fits the new oil pan. The markings on the deep stick are correct but the length is a bit too long. The new pan is 8 quarts in capacity. Fill up the engine with oil and have a beer. :)


Engine prep

At this time I had the fuel lines positioned all the way up to the engine. I needed the engine dropped in to make sure I have the line ending at the right spot. This is where the adventure begins.

Before the engine goes in it needs to be "refreshed". The thing was in the mustang for over 10 years so it's not looking shiny enough for me. Moreover, the engine has to go through a series of small modifications to make it work in the new home.


The engine has spend the longest time on the stand now. It has collected some dust and needed a basic clean up job. I did not go overboard with this and gave up after a quick Simple Green MAX degreasing. It was good enough for me at this time. The next part was to get collectors off. They will be turned 180* to face forward to work with the side pipes. These things are not pretty by any means but apparently (and a bit sadly for me) are well designed and don't impede the flow. So no headers for me. I did, however, spend time to gasket match the ports on them.


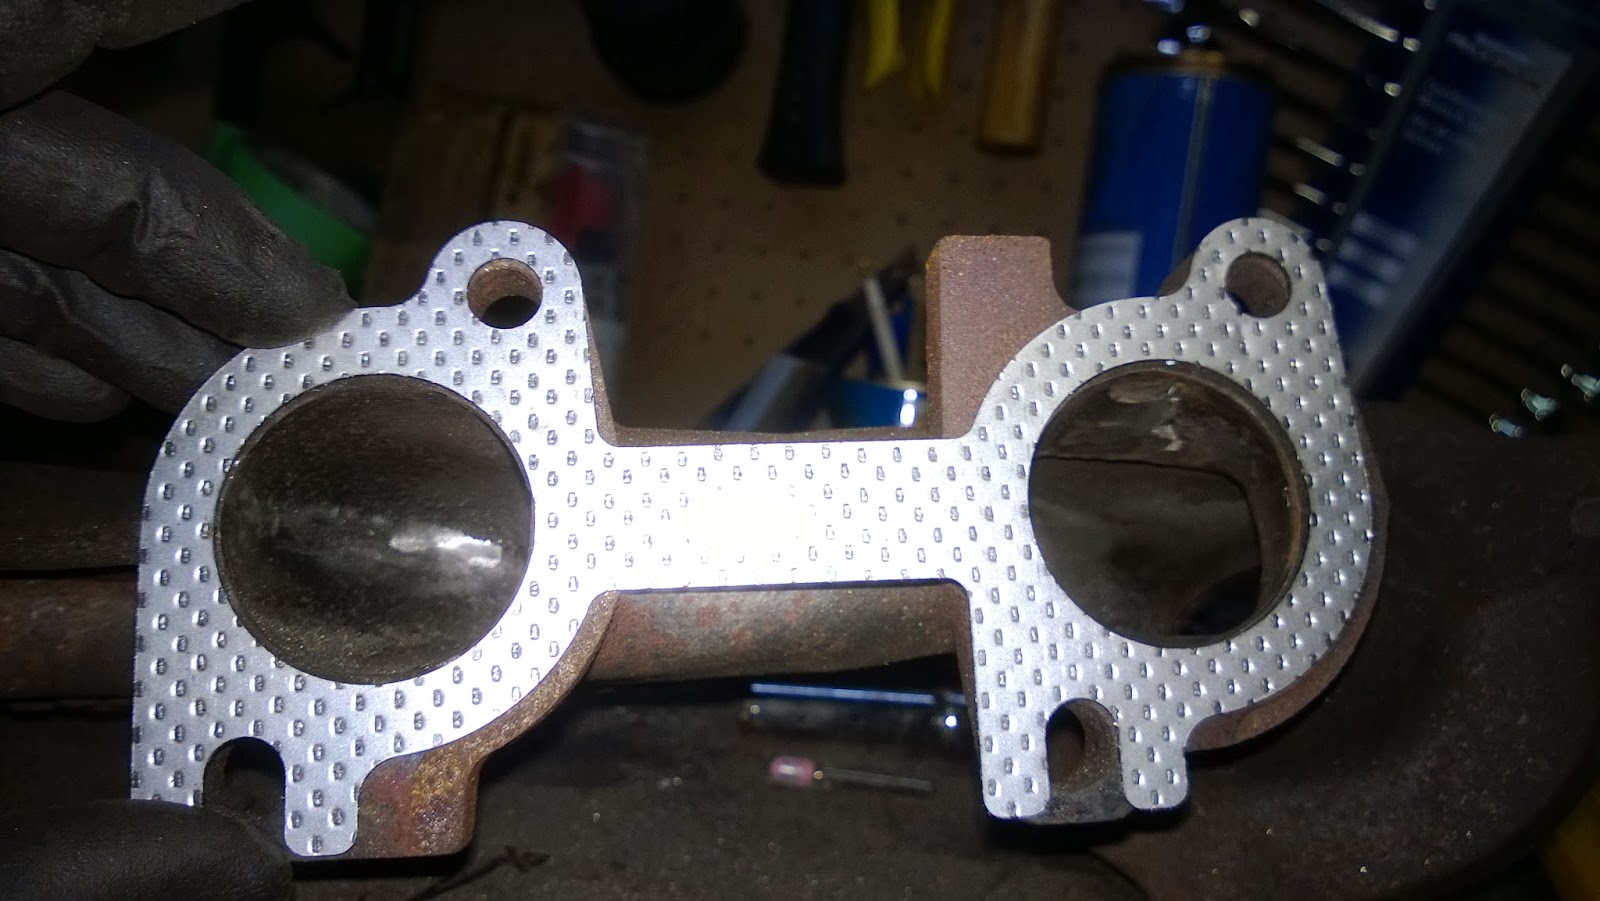
I also ensure that the inside is polished too. The casting left the surface full of mini bumps. It took me way too much time and effort to level it out and bore out the ports. It is cast iron after all. The things went significantly faster on the other side of the gasket. The heads are aluminum and are much softer. Here are some pictures of before. If you look close enough you'll notice that the gasket is about 1-2 mm larger than the port.

 
Here it's more obvious with the carbon deposit marks. See what happens when the gasket does not fully seal the exhaust system? The left port here exposes the blow by the gasket visible by the black deposits.


And now the "after"


Now that collectors needed some make over too


and now comes some header paint from VHT


While at it, the cats get the same treatment.


Ah, the things I do for my wife. These stupid things have a brick inside that chocks the exhaust system and robs me of the valuable horse power. But I have to make sure my loved one is not deafened by the roar of the V8. On the plus side, she cannot complain anymore that my cars are not environmentally friendly gas guzzlers. Maybe one day the turbos will replace these pesky catalytic converters. However, till that day comes they will be pretty.

Since I am on the painting spree, the engine block got a coat of VHT metallic paint


The trick is to use aluminum foil for masking. It's way easier than any kind of masking tape and paper. Here's the result.


It's not in your face colour popping paint job but I like it. While the engine mounts where off the block they too got sprayed.


I will take a break here and continue in a next post. The next little mods are a bit involved and deserve individual posts.

Sunday, February 9, 2014

Give me fuel! give me .... anything but fire.

I was moving on to complete the fuel system. There were a few tasks remaining. One was to complete the filling neck. The second was to run the supply and evap lines to the engine. The strange thing is that I did not take any pictures making the filler neck. Therefore, I am not going to spend much time on it. It was basically cut at the right spot. Insert the hose between the two cut off parts. And have a cold one.


Of course, it was a bit more involved but really nothing to write home about.

The fuel lines were a bit more interesting. First of all, I did some planing. I am quite proud. I rarely do planning. Due to the location of the lines, the fuel filter could not be easily mounted. That was one of the reasons for the battery relocation box. That box will also act as a fuel filter support bracket.


I replaced the old mustang filter with the fresh one. I got this thing from Part Source and, unlike the old filter, it did not have the flow direction arrows. I had to put them on myself to avoid placing the filter on backwards.This location worked out really well. The hoses were not forced into place but maintained their original bends for most of the time. The hard fuel line was bent to work with this location of the filter and therefore worked perfectly.


Taking pictures from under the car with the light above does not work well.


Here you can see the thicker metal line routed along the brake lines. The hose is the evaporation line that I got from NAPA. Both, the supply fuel line and the evap line are running along with the brake lines. In fact, I used some of the funky mustang plastic mounts that hold all the lines together.

In order to know the required position of the fuel lines at the front I had to put the motor in to see where the lines should be.


At this time, it was just a dry run the motor would have to be pulled out later.


It was a good exercise and as you can see the perfect location for the fuel line was found. The supply line come up from under passenger foot box and goes up along the bend. This location actually moves the fuel line far enough from the exhaust manifold and the associated heat.

The evap line ends into some control valve. I did not want to expose the evap system unnecessarily and chose to hide it here.


It's actually right by the bottom of the passenger foot box, near the 4" frame tubing. Here you can see the fuel supply line come up too. The location for this purge valve looked good. I used some nutserts to mount the valve to the sheet aluminum.

From here on things went a bit sour. Too start, the picture above does not show starter motor. Once the starter motor was in placed the purge valve was awfully close to it. I haven't looked into that problem yet. My attention was concentrated on the fuel leak that was happening at the only custom made flare between the hard line and the hose that links to the engine.


My attempt to repair the flare only ruined the line further. The above pic clearly shows how the flaring tool slipped stripping the top level of metal. This resulted in a purchase of a 30" fuel line with the flares done on both ends at the factory. The new line was a bit too long. I would love to have something around 24-26".


The new line above is a bit long and had to curve to the front a bit. The tissue on the junctions is there to see if there are any new leaks. And there were sadly. I was not out of the woods yet. This time I could only blame the barb fitting. I was using the Factory Five supplied Edelmann fitting. Till now I have two theories, either the fitting was defective or it was damaged during my first installation against my hand made flare. I found it a bit challenging to find the fitting. I could easily order it form Summit racing but the shipping would cost me dearly. Luckly, I found out that WrenchMonkey had the fitting and would not cost me too too much for shipping. They are actually located very close and were able to deliver my part next business day. Once the fitting was replaced I was back on track with no more fuel leaks. However, all these fuel leaks had ruined my black rubber coating on the foot box. I'll have to fix that up one day. On the bright side, nothing caught fire. I have a video of the car cranking with fuel dripping and sparks flying but that's material for next posts. For now, I have bought one of these