The time has come to make sure that the snake will stop. It's not going far for now but let's hope for the best for later. The brakes need to be done rather early. The main reason is that running brake lines is much easier when there are less parts in the way.
The brake system is very primitive. We have one pedal that causes pressure in one the cylinder. In turn, this pressure causes the pistons in brake calipers to press brake pads against rotors. That is it! No magic here. In fact, that's exactly how Factory Five wants us to build brakes. That's what they have in the build manual. And that's how cars were build back in a day. Moreover, some new race cars are still build this way. As a matter of fact, NASCAR racers still have this setup. However, there has been some modernization done to the bare bone brake systems over the past 50+ years. Some of it is nice and some of it may be argued endlessly depending on various perspectives.
Let's start with simple stuff. Today cars have dual piston master cylinders. That part connected to the pedal. The main motivation is safety. Say you were unlucky and hit something big with the bottom of your car and one of your brake lines developed a small leak. This would be the end of your brakes normally. But if you have two cylinders, it would be only the end of the half of your brakes. :) You would still have one completely functional system that operates, usually, half of your car. Here's the modern car trick demystified. We have two cylinders. Each controls one front wheel and one diagonally opposite rear wheel. This adds some redundancy and increases safety.
The next major difference between older cars is the comfort. Today, most of the R&D goes into the refinement of the cars. We don't really see any new innovation in cars drive train. The story is very different when it comes to everything else: ride quality, interior finishes, electronics, etc. The brakes are on that list too. The major enhancement that was done is called "power brake" or "brake booster". The motivation was to make the actuation possible with least amount of effort from the driver. If you want to experience the "manual" brakes in your everyday car, just let it roll down the hill in neutral with out engine running and step on the brakes. (Be prepared to REALLY step on the brakes and if anybody asks: it was YOUR idea :))
Of course there must be the infamous ABS. I'm not even sure many people know what it is but they all want it anyway. This is where things turn 20th century. We have electronic sensors on each wheel connected to a computer that is controlling the brake pressure at individual wheel. The truth is I don't know exactly what witchcraft is happening inside this actuation box so let's just call it "the box of tricks". :)
One more thing that was recently added to the brakes is "traction control". Surprised? Well the reality is that cars loose traction when the driver has the right foot a bit too heavy. The brakes come to the rescue in such events. The computer on board, the same thing that controls ABS, applies the same witchcraft using the same "box of tricks" to, basically, apply the brakes. So, really, the traction control is just a piece of software that help us restrain those crazy drivers out there. Luckily for those crazy drivers, there's an override button :)
Enough with the theory. My plan is to retain all of the features mentioned above. The power brakes, ABS, traction control, all of it. There's a remote possibility my wife would want to drive this car. Let's eliminate as many excuses "not to drive" as possible.
Onto the mounting of the components. You have already seen the pedals. The thing on the other side is the master cylinder.
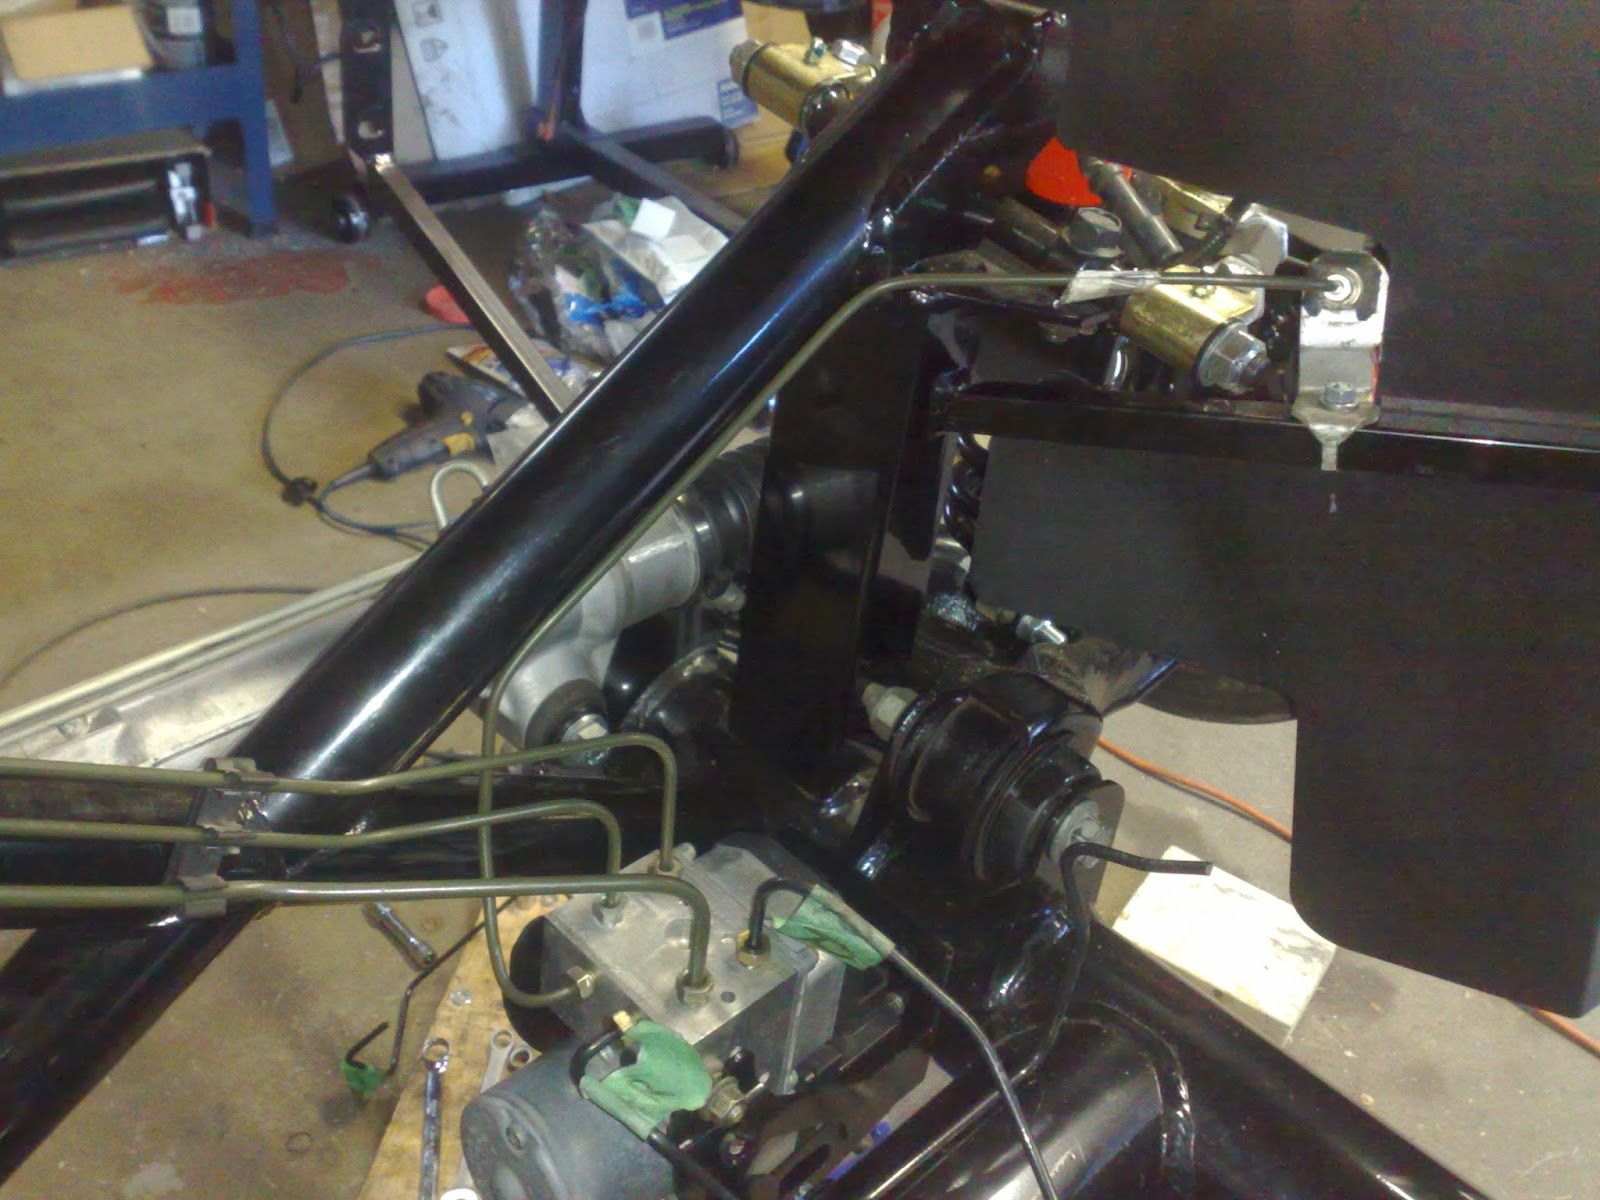
Notice that there are two metal lines are coming down from the dual master cylinder. There are also two bleeders with back rubber caps for bleeding each cylinder. The interesting part here is that the fluid reservoir is on the other side of the 3/4" tubing and would be inaccessible with the body on. Thus, the problem needs to be addressed but later. Now we need to mount that "box of tricks". I modified the mustang part and found a new home.
It was originally mounted like so but it turned out too low
Later I relocated it a bit higher but in the same spot. The bottom had to be inline with the frame. Here's the final assembly
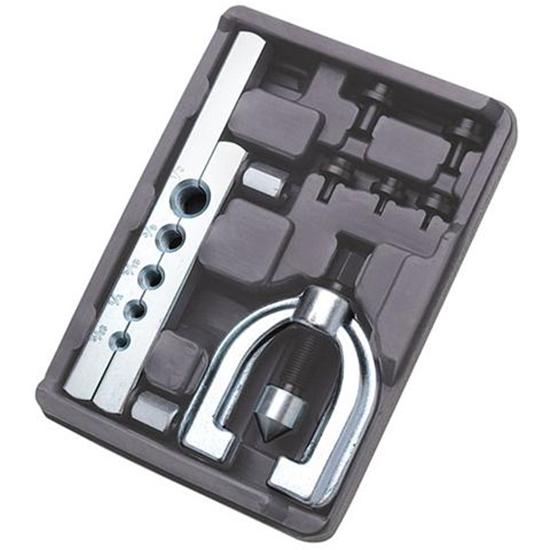
Now onto the fun part: connecting all the components together. This is usually done by running steel brake line between components. The lines need to have a perfect seal to withstand thousands of psi of pressure. To do so the lines are flared on each end and are pressed in place by end nuts. Since the lines are custom formed for each application some tools are required to complete the job. Here's what I've got.
The cheap flare tool. The reviews are true. It does suck.
And this bender. Tricky to use but no complains.
Here's what it all turned into
The start was the hardest but once I got the hang of it it was a blast.
The rear end got a bit busy but not tricky. I think it was harder to take the proper picture rather.
Now back to that reservoir accessibility problem. Do you remember these on the road?
Well that bad boy had the brake fluid reservoir mounted on firewall. That means I can do following using the parts form that car.
The only catch is that that car is out of the production for some years and the parts are not available anymore. So be friends with your local junk yard. ;)
Once the lines were all affixed to the frame the system had to be complete with those red shiny calipers.
And there you have it! I dragged my wife out to help me bleed the system. It took some time and effort but in the end the brakes are done and functional. The brake booster is not connected yet but it's in place. The same goes for ABS electronics. All the sensors are there but no wires yet. That's it for now.