Tuesday, November 27, 2012

The dusk of Mustang

It's getting really hard to tell it's a mustang at this point. Some people can't tell the generation of the mustang. Moreover, these are the part buyers, the enthusiast who know their mustangs. The car is light. In fact, it's stopped being a car. Now it's just a shell. I am actually glad that I went with a donor build. This way I got to play with Mustang too. Sure getting all the new and shiny parts is nice but different. Well, that's my opinion for now at least.

The next step is to send the Mustang left overs to the junk yard. That presents the first challenge. How do I get this thing out of my garage if it's missing wheels. I also exaggerated my strength. I pulled out my engine crane and hooked up the rear of the car. Then I when on to lift the front and no dice. The car is still heavy enough. The next challenge is finding somebody to take this shell. I called a couple of car disposal companies and none of those want to take the shell. Autowrekers would take it but at my expense. Some metal recyclers would take it but for free. So after a quick Kijiji search I found the right guy. He offered me $40 for the shell. :) Hell, it's more then nothing. As a bonus, he gave me some tips on how to get the car ready for the pick up.

My dad came up with a perfect solution for moving the car out problem. He sources some dolly wheels and a thick 3' x 6' plywood. We screwed a 2x4 down the center to strengthen the structure and attached the wheels at the corners. With the engine crane we lowered the car shell on our new dolly and carefully rolled it out the garage. I left the crane attached to take on some weight. I had no faith in the dolly.


And I cheated too, if you look closely you can spot the jack under one side. The car did not rest perfectly on the dolly so the jack kept the unsupported side up. So what do I know, the dolly held up and the car made it to the outside. I really like that crane so why not to use it at every chance.


And just like that, the dolly comes out and the plywood goes under. Time to call the scrap guy over but that for another day. That means I can take some trophy pics:


Once again I had to bust out my engine crane to move the shell over to the first garage stall. It would have been very difficult to load the car from where it was originally placed. I also did not want to get the driveway damaged by unnecessary dragging. The scrap guy was running late so it got very dark. I had nothing better to do so I ended up taking to may pictures. I can almost make a time-laps video.


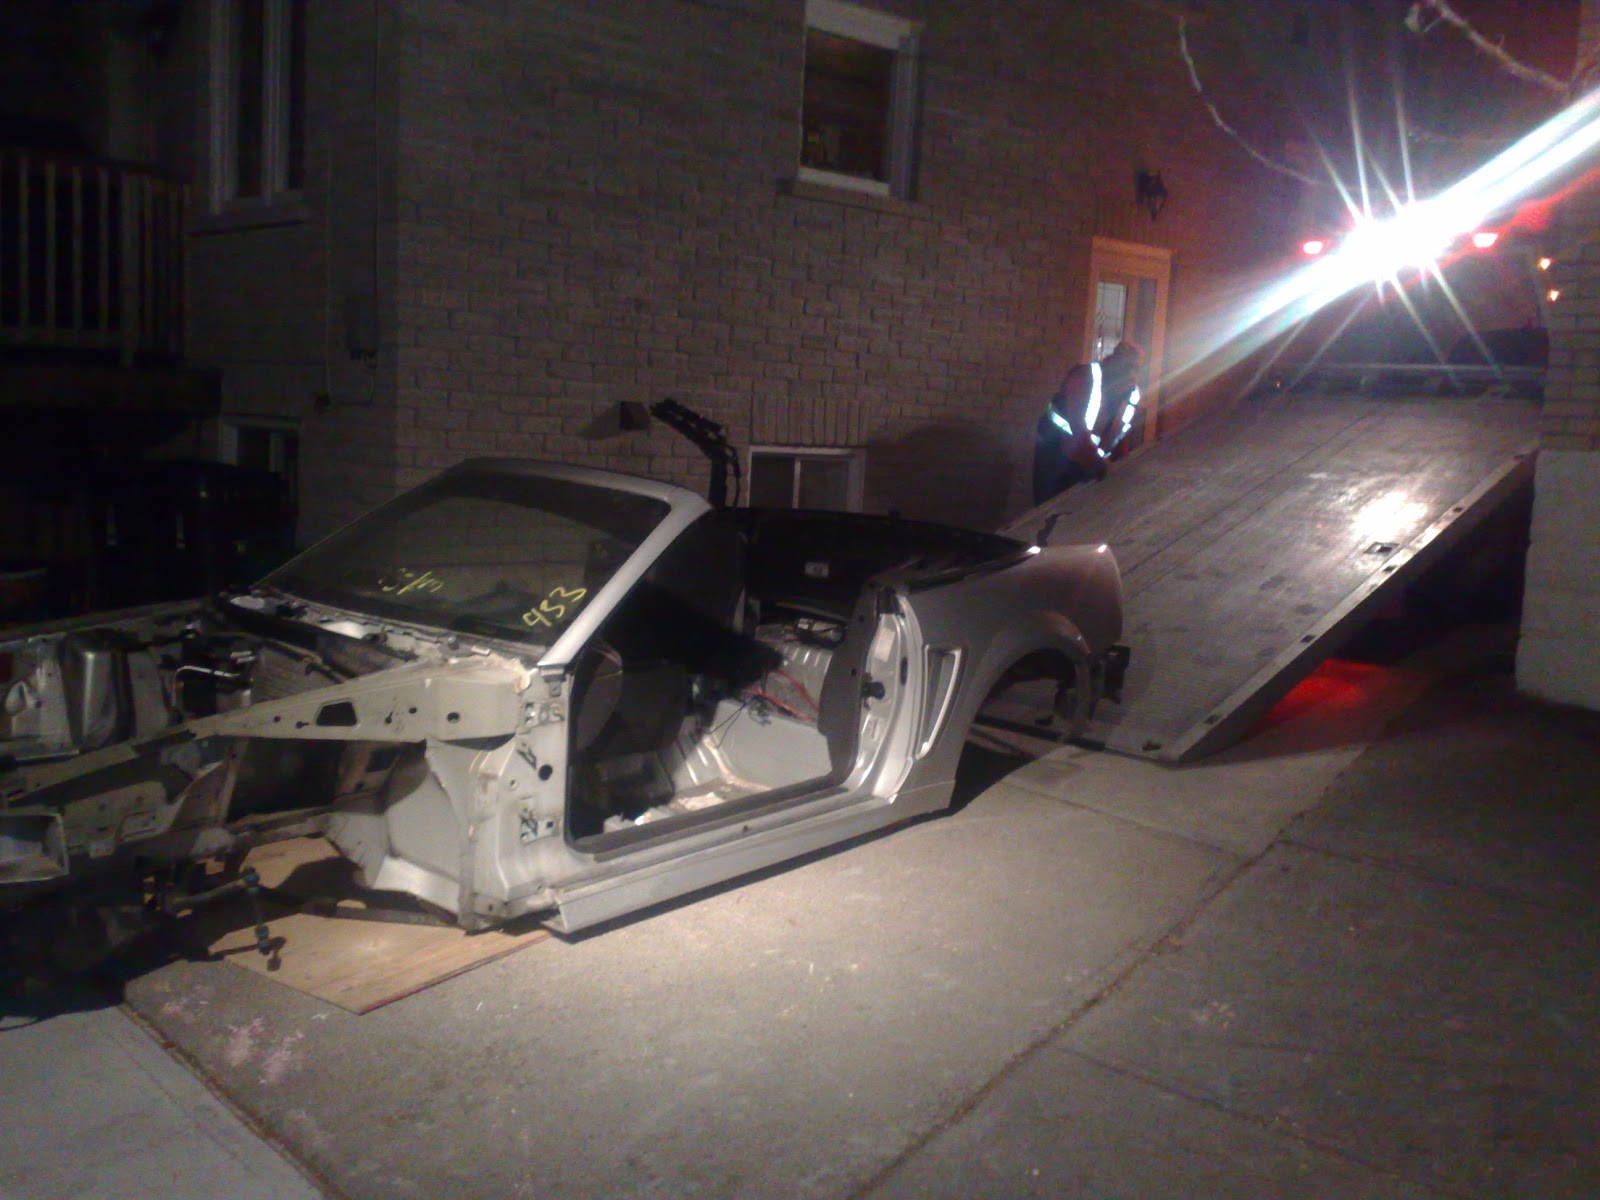
He was pocking jokes at me saying I would start crying over this car and that's what all those pictures are for. He then came to a reasonable conclusion that I had to gather Facebook material. The guy was nice, friendly and cheap. He only gave me $30 after he realized that the car was too stripped down and he would not be able to make much money on it. Frankly, I just needed it gone. So long Mustang!

I did not get attached to that car at all since I never actually drove it. So even after owning one, I still don't know what Mustangs are like. :) Easy to take apart but that's all I learned. Well next steps are less applied. Now I need to wait for the Factory Five to post a special on the kits. I did miss Black Friday deal already. I suspect next one would be around Holidays. Time to cleanup garage ...

Sunday, November 25, 2012

Fear this

See as a kid, I had an accident when I was playing with gasoline. I had a jerry can open and an open flame a garage. Guess what: I was blown back 3 metres and lost the skin on my face and most of my hair. That incident kind of thought me to respect fuel and fire. In fact, when I did my fuel pump upgrade on my Subaru I did that during the winter when it was -20 C outside. See, I read somewhere that fuel does not evaporate much at that temperature.

Oh well, getting on with it. I mentioned before that I could not get the fuel lines to "quick" disconnect. Previously, during the engine pull, I used a tin can and tin snips to cut out a peace of tin. That peace I would wrap around the fuel line and push it into the quick disconnect. It worked for the fuel rail. Here I was faced with 3 connections. Two at the inline fuel filter and one after the fuel pump. They just would not want to play with me.

Luckily, I know a buddy who has a set of those fuel line disconnect tools. I borrowed the tolls and disconnected the lines. All but the one past the fuel pump. I think there's enough dirt and dust in there that would not let me slide the tool inside. It's still November in Canada, so let's wait for the worm weather to come back to finish that off. There a few nice plastic mounts that hold the rails to the body. I took those off too. I may reuse them on the cobra. With the lines disconnected form both ends and mounts removed the lines simply fall on the floor.


I helped them to the shelf.

Fuel tank is the fun part. First I disassembled the filler neck and unhooked all the hoses around. Surprisingly there's no complexity to that. As a matter of fact, the filler neck simply slides into the grommet. The fuel tank is strapped in with two metal straps. Before undoing those make sure you support the tank some how. I used the wood and the jack but once the straps were loose the tank fell down from my support. No harm since everything was disconnected and there's a plastic protective cover. The only difficulty I faces was draining the tank. I did not spot any drain plugs. So I simply tilted the tank and poured fuel from the filler neck grommet. I had my dad hold the funnel and jerry can. Make sure to use some sort of filter if you are planning to use the fuel. There were some debris on the tank even after brushing it off and wiping it with a cloth. It is definitely a 2 men job. The tank with fuel is not light and is hard to aim at the funnel. I topped off my dad's car after we were done. That's it. The fuel system is off too.

For the next couple of days there was a strong smell of gas in my garage. Even with the fuel tank openings tied off with a plastic bags. I think it's from the fuel lines and some spills that I had. I hope the smell would go away after some time.

Live axle drops

As I've mentioned in previous post. I gave up on the brake lines and moved on to the rear end. To be 100% honest I gave fuel lines a crack too but those did not want to cooperate without the the proper disconnect tool. More on that to come later.

Rear axle is held in place by many bolts. I have previously taken out the springs and the main struts. But there are all the arms left in place and some other shock looking linkage. As with the rest of the jobs, I don't see any challenges. In fact, it was somewhat smooth. Get a plank of wood. Put the jack under the diff with wood in between. Jack it up to loosen the tension. Undo all the bolts on the arms at the unibody end. Some of the arms will simply come out others will need a bit of persuasion. In my case, one of the bushings got squeezed due to the deformation resulted from the accident. So that joint point required much more wiggling and and 2x2 persuasion but it did let go. In fact 2x2 fits nicely in between the body and the lateral arm and was very instrumental.

Here's the fun part. After all that wiggling and last arm disconnected the axle rolled down the jack. It did not fall and break anything but gave a clear indication how heavy it is. Truthfully, I was not expecting it to be that heavy. However, my jack was pulling a wheely at that moment. The fact that it ended up on the jack actually worked out well. I simply pulled the axle out on the jack. After my back refused to lift the axle. I got my engine crane out and strapped the axle in. VoilĂ !


That's the last major job completed. Next one up is the fuel system.

Wednesday, November 21, 2012

Small thing but took long time

It is a bit hard to justify removing wiring harness as a precursor to rear end job. However, hand brake removal makes more sense. At least so at first. Frankly, the hand brake only has 2 cable connection and wiring harness has 2 ABS sensors ;). But who cares, I am here trying to postpone the heavy lifting of the rear axle. So hand brake comes first.

The hand brake is a no-brainer. Undo the handle nuts. Unhook the T connector. Fish the cable through the hole and put the thing on the shelf. Done! Well, there's still those two cables going from T connector to the actual calipers. Again, unhook the cables at the caliper end. Undo a couple of screws that hold the mounts to the unibody. Fish the cables out of the body pockets. And you should be almost done. The tricky part is that last bracket. You see, the other ends of the cables are snapped into a bracket that is welded to the unibody above the drive-shaft. The cables have a funny clip that holds them in the bracket. The clip is round with 3 barbs evenly spaced around. The challenge is to get all 3 barbs squeezed and push the clip out form the bracket. Due to the location of the bracket there's not much visibility of all 3 barbs. I was able to press at most two of them but one was always left out. The fact that the two ends are next to each other just reminded that there's twice as much frustration. I even used my creativity and strapped a hose clamp around the barbs but the clamp was not strong enough to squeeze the barbs too. So after a short while I gave up and decided that I need more "POWAA"!


Yep, I took the grinder to it. It did not help at all. So I had the bracket hanging on the cables. I could not see all the barbs but still did not lucky freeing the cables out. In fact, I gave up and moved on to the axle that day.

I came back to take the cables out about a week later. It's still in Canada and still November. But fear not because I got this:


I found I had that from long time ago stuffed with other junk I have never unpacked after the move. It's obvious that heater did nothing but thankfully we were still getting around 10 C degrees out here. In fact, the temperatures were starting to drop off and that motivated me to finish the job.

This time however, I sought advise from community. I can't remember the exact forum but it's out there. And here's the trick that makes the impossible possible.


And just like that the bracket let go of the cables.


See no need to cut and break stuff. Once again I've got frustrated, done some stupid things and solved nothing. In the retrospect, it did feel nice taking a grinder to the car. :)

Monday, November 19, 2012

Zappy job

It's November and it's Canada but it's 17 C out there. Is it a sign? I work at the bank and being the laziest ones out there banks are off for Remembrance day. So I get an unaccounted for long weekend. I kind of found out about it the Friday before. Definitely a sign from the fate to finish off the donor tear down.

The time has come to remove the rear axle. But that's a heavy part. So I put that off the later and I am off to remove all the wires. There's is nothing difficult about removing the wiring harness off of a car. Run around with a flat head screwdriver and a needle nose pliers and pull all the connecters apart. Label them. Label them. Label them. The harness is actually composed of few sections. So tackle one segment at a time.  So that's exactly what I did.

Here's the first:

And then some more


And then some more


The ECU (PCM, EEC, etc, the brain) is a bit of a pain to remove. It's tacked into the passenger side wall. It's a bit too hard to access the screw that's the closest to the firewall. I guess Ford folks put that in first before mounting heater and other accessories there. Luckily, I had no fenders on so that makes it simple to turn the screw out using pliers from the outside.


I think I labeled all I needed. At least I hope I did. The time will show if i missed a critical plug. There are a lot of wires. Some modules are there obviously for air bags and corresponding sensors. Those would need to be stripped out. As well as the remote door and trunk openers, fog lights, heater control, stereo, power convertible top, etc. I bet I could simplify this harness a bit. But that's for after. I would probably have to do it after the car starts and drives. I am too scared removing the wires blindly with out testing. However, if i get bored in the winter time, I might start on simple stuff.

For now, all of that is connected together and in a big box that goes in a far corner of the garage.

That's it. This job is almost too quick. It did not give me enough procrastination before rear axle. I bet I can find something else however.